
This Blog post is a WIP, but you can follow along on the Github repo here
If you’ve stumbled upon this blog, chances are you’re knee-deep in a similar trench to mine - untangling the serpentine complexities of data engineering. Today, I’ll be sharing my journey through building my project that I named RetailFlow - a journey of data extraction, loading, transformation, and visualization which you can see in the diagram below.
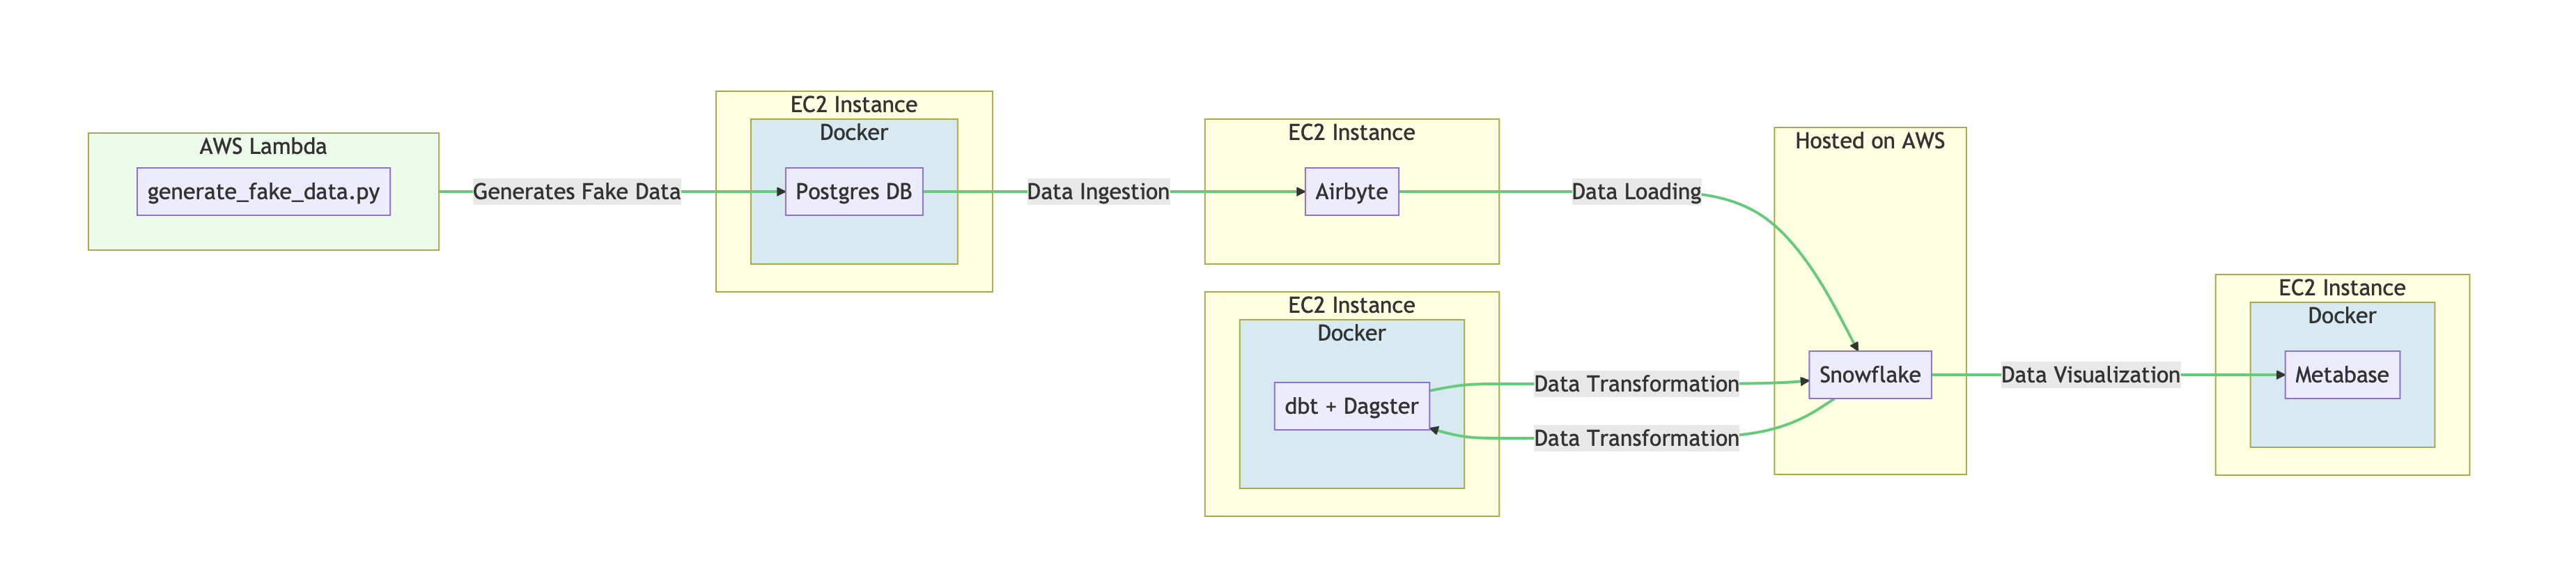
I had always wanted to build an end-to-end ELT pipeline for an e-commerce platform from scratch, just to see what it’s like! My tools were my favorite cloud computing provider, AWS, and a suite of state-of-the-art tools: Airbyte, dbt, Dagster, Snowflake, and Metabase. However, it wasn’t enough to run these tools locally; I wanted to be able to create all the infrastructure on the AWS cloud with a single command (well, a few commands)! A daunting task indeed, but one that left me positively giddy with anticipation. Additionally, I chose to run the entire project on EC2 instances instead of managed services, including using the EC2 manual launch type in order to practice containerization, configuring memory and CPU units, and networking.
Setting up everything and provisioning the cloud infrastructure
As this project is entirely automated using Terraform and ECS to deploy the Docker containers and AWS infrastructure, we’ll need to do quite a bit of setup. Luckily everything is automated and we only need to run the Make recipes. We can begin with make main-config. This recipe is responsible for receiving the Snowflake credentials, preparing Snowflake to receive data through Airbyte, and updating the ECS task JSON files with your AWS account id. Additionally, this command builds the containers that we need to run on our EC2 instances.
 Going through the main set up process
Next, we run make infra-up. In essence, this command acts as the heart of a cloud deployment operation. First, it calls airbyte-run-command to ensure executable permissions are set for a critical shell script. Next, create-ecr-repo is called upon to harness the power of Terraform, setting in motion the process of creating an Elastic Container Registry (ECR) in AWS. Afterward, the push-containers section comes to life, tagging and pushing our Docker containers to the newly minted ECR so that ECS can use them. The next phase, ec2, returns to Terraform to spin up the required EC2 instances in AWS. Finally, lambda wraps things up, creating a Lambda package complete with the necessary dependencies, and then using Terraform one last time to establish the Lambda function in AWS. With all these components in place, our cloud infrastructure is ready.
Provisioning our cloud resources
Following the data through the pipeline
The data generation forms the initial part of our process and is carried out by a Python script. Python serves as an invaluable tool for a data engineer, akin to a master key unlocking a multitude of possibilities. Our trusty Python script, powered by AWS Lambda, operates relentlessly to supply our PostgreSQL database on AWS EC2 with freshly minted data, employing SQLAlchemy for data manipulation. Furthermore, Terraform provisions a CloudWatch event to trigger this Lambda function every three minutes, ensuring a steady flow of data. Once everything is set up, the Python script can be easily viewed using the make command outlined below.
Checking the output for make print-lambda and checking the postgres instance by ssh’ing into it
Next, we took a ride on the Airbyte, moving data from PostgreSQL to our data warehouse, Snowflake. Interestingly, I discovered that Airbyte runs on Docker itself and therefore cannot be containerized for ECS! With Airbyte running on its own EC2 instance with a simple Bash setup script, it was like having a personal chauffer dedicated to delivering data to Snowflake’s frosty schema. Airbyte’s load time can run as frequently as every five minutes, so I set the Lambda function to run every 3 minutes to simulate a CDC production environment to ensure there’s always fresh data.
Configuring Airbyte to use Postgres as the source and Snowflake as the destination
Then came the transformation phase, the crucible where raw data is hammered and shaped into insightful information. I chose dbt and Dagster for this task - two power tools that can make any data engineer feel like Thor with a hammer. Here again, AWS EC2 played the faithful steed, hosting both tools within four Docker container (3 for Dagster, 1 for dbt) to ensure scalability. These are the models that were made in dbt: total revenue, total discount, net revenue by city/state/country. For the sake of this project, we won’t wait for a scheduled execution and we’ll kick off the dbt pipeline with dagster by manually executing the job once we know the data has made its way to Snowflake. I waited half an hour so that the pipeline had time to ingest the data few times.
Executing the dbt models with the help of dagster and checking the results in Snowflake
The Dagster and dbt integration is a simple, streamlined process that begins by loading the dbt models as assets into Dagster via the dagster-dbt library. This involves using the load_assets_from_dbt_project function to compile the dbt project, parse its metadata, and generate a corresponding set of Dagster assets. The Dagster code location is defined, essentially marking the Dagster project’s workspace and supplying configuration for the DbtCliClientResource resource. It’s this resource that enables dbt CLI commands to be fired off within the project. By using load_assets_from_modules, all assets in the asset module are automatically included in the code location, without the need to manually add them one by one. With the assets loaded and the code location set, you can then view the assets in Dagit, Dagster’s gorgeous web interface.
Taking a glance at the dagster web UI
Finally, we had Metabase, the artist in our process, turning raw data sculptures into beautiful canvases of analytics, providing our stakeholders with insights as crisp as an autumn morning. As you might have guessed, Metabase, too, had its exclusive EC2 instance, churning out data masterpieces. If you want to run Metabase in production, you’ll need to store your application data in a production-ready database, but for the purpose of this project I used the embedded H2 database that it ships with. The reason it’s necessary to have a dedicated database is because if you remove the container, you’ll lose your Metabase application data (your questions, dashboards, collections, and so on). Another interesting observation that I made is that Metabase does not support configuring data source connections through environment variables or the Dockerfile directly. This is largely due to security reasons, as connection details for databases often include sensitive information like passwords and API keys, so you’ll need to open the Metabase GUI and set up the connection to Snowflake manually.
Accessing the Metabase GUI through the browser and configuring the source as Snowflake
How does connecting EC2 instances work?
In order to pass data between EC2 instances, the EC2 instances need to be in the same VPC and Security Group, as this controls network traffic between the instances. For the purpose of this project, I set up a Security Group rule to allow all ingress and egress connections. Lastly, in a production environment, consider encrypting network traffic between instances with tools such as SSL/TLS. Since I didn’t specify a VPC during the Terraform provisioning, the EC2 instances will be automatically created in my account’s default VPC.
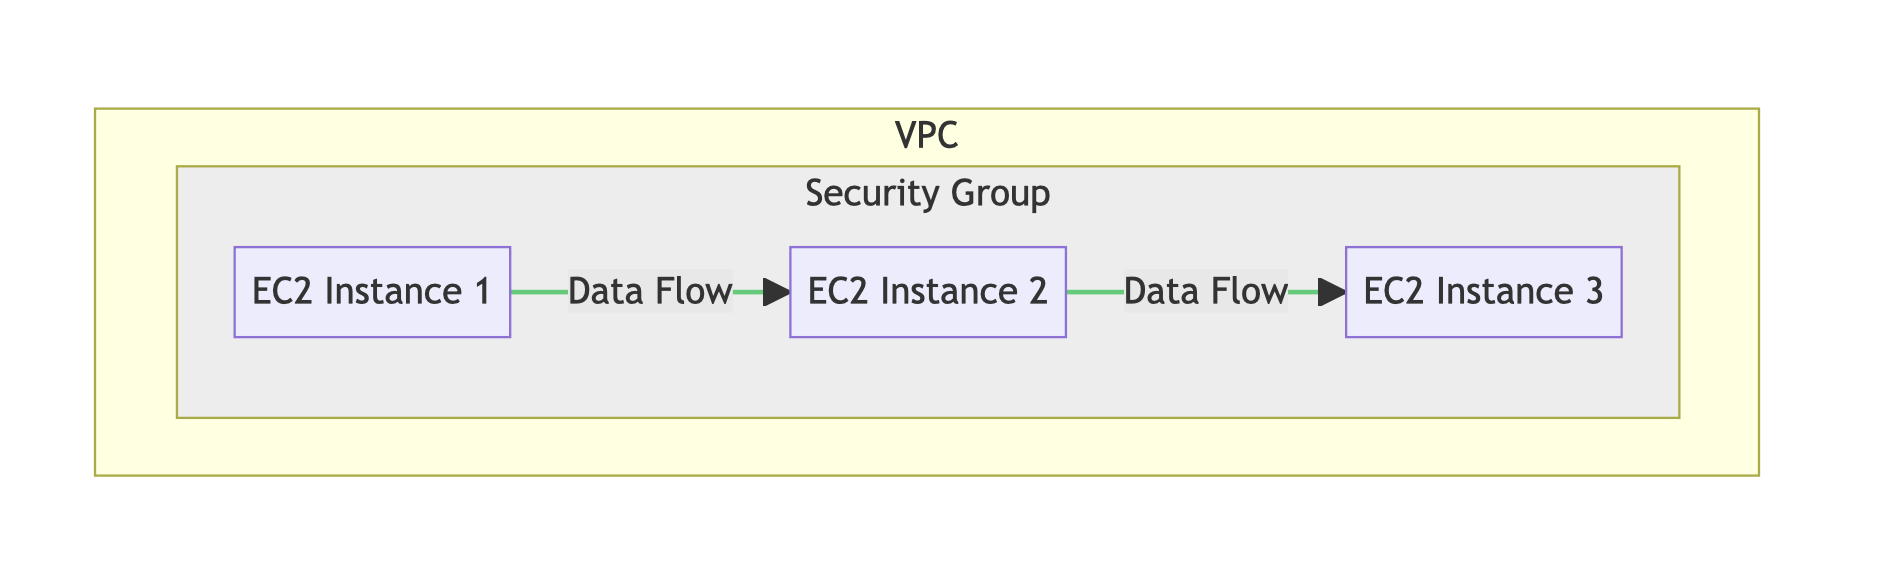 A diagram showing how the EC2 instances reside in a Security group that allows data ingress and egress, which itself resides within the AWS Account’s VPC
Conclusion
All this would be a house of cards if not for the magic of orchestration. Here, Terraform was my sorcerer’s wand, creating and managing our infrastructure, while Docker served as our trusty timekeeper, ensuring consistency across development and production. AWS ECS, on the other hand, was like an experienced symphony conductor, gracefully managing our Docker containers across multiple EC2 instances. Since Airbyte cannot be containerized, I simply had Terraform execute the installation bash script on its EC2 instance once it was provisioned. I would also like to thank the Dagster, dbt and hangops Slack groups for assisting me with this process.
Reflecting on this project, it becomes evident how intricate and multifaceted an end-to-end ELT pipeline truly is. Yet, the successful completion of RetailFlow is a testament to the power of effective orchestration and strategic tool selection, even in the face of substantial complexity.


